findViewById 注解、泛型、反射、MVVM
- 常规
- 注解
- 泛型
- 反射
- 在线生成
- DataBinding
- 源码实现
0x01 常规
这里findViewById作用以及用法就不再叙述了,接触过Android开发的都明白其怎么用,这次主要分析如何提高其性能,并且使用TraceView分析,如何改善或者节省代码,使开发人员变得更懒。
环境:
Mac 10.11
Android Studio2.0
SDK24
如何使用TraceView监测代码呢,在想要根据的代码片段之间使用以下两句代码,注意添加SD卡权限。当然也可以直接在DDMS中的面板里的Start Method Profiling来监测方法。此次就将代码放置在initView()方法里,以示区别。并且都是启动一次,再结束activity,然后再启动Activity去比较运行时间。
Debug.startMethodTracing("debug_test");
Debug.stopMethodTracing();
//权限
<uses-permission android:name="android.permission.WRITE_EXTERNAL_STORAGE"/>
<uses-permission android:name="android.permission.MOUNT_UNMOUNT_FILESYSTEMS"/>
//adb导出
adb pull sdcard/debug_test.trace
这里采用的xml文件是这样的,其中包含了几个TextView,ImageView。
<?xml version="1.0" encoding="utf-8"?>
<LinearLayout xmlns:android="http://schemas.android.com/apk/res/android"
    xmlns:tools="http://schemas.android.com/tools"
    android:layout_width="match_parent"
    android:layout_height="match_parent"
    android:orientation="vertical"
    android:paddingBottom="@dimen/activity_vertical_margin"
    android:paddingLeft="@dimen/activity_horizontal_margin"
    android:paddingRight="@dimen/activity_horizontal_margin"
    android:paddingTop="@dimen/activity_vertical_margin"
    tools:context="com.sxau.findviewbyiddemo1.MainActivity">

    <TextView
        android:id="@+id/tv_demo1"
        android:layout_width="wrap_content"
        android:layout_height="wrap_content"
        android:text="Hello World!"
        android:textSize="32sp" />

    <TextView
        android:id="@+id/tv_demo2"
        android:layout_width="wrap_content"
        android:layout_height="wrap_content"
        android:text="@string/textview1"
        android:textSize="32sp" />

    <TextView
        android:id="@+id/tv_demo3"
        android:layout_width="wrap_content"
        android:layout_height="wrap_content"
        android:text="@string/textview3"
        android:textSize="32sp" />

    <EditText
        android:id="@+id/et_test"
        android:layout_width="match_parent"
        android:layout_height="wrap_content"
        android:inputType="text"
        android:textSize="32sp" />

    <ImageView
        android:id="@+id/iv_test"
        android:layout_width="wrap_content"
        android:layout_height="wrap_content"
        android:contentDescription="@string/iv_text"
        android:src="@mipmap/ic_launcher" />

    <Button
        android:id="@+id/btn_test"
        android:layout_width="wrap_content"
        android:layout_height="wrap_content"
        android:text="@string/tv_btn"
        android:textSize="32sp" />

</LinearLayout>
string.xml
<resources>
    <string name="app_name">FindViewByIdDemo1</string>
    <string name="textview1">test</string>
    <string name="textview3">test2</string>
    <string name="iv_text">图标</string>
    <string name="tv_btn">btn</string>
</resources>
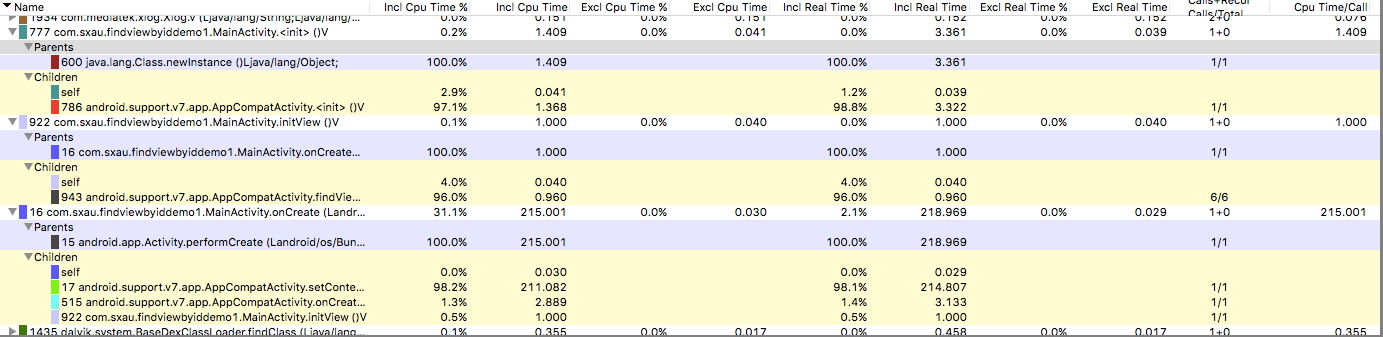
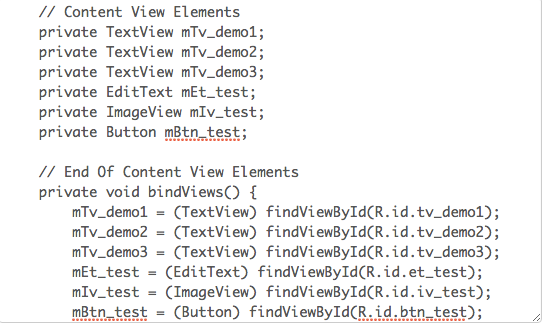
常规的即使用findViewById方法。即:
textView1 = (TextView) findViewById(R.id.tv_demo1);
textView2 = (TextView) findViewById(R.id.tv_demo2);
textView3 = (TextView) findViewById(R.id.tv_demo3);
editText = (EditText) findViewById(R.id.et_test);
imageView = (ImageView) findViewById(R.id.iv_test);
button = (Button) findViewById(R.id.btn_test);
测试结果如下:
0x02 注解
如何使用注解这种的避免传统的findViewById呢。
很多开源框架已经支持注解了,就以Android Annotations框架为例。
View注解也分运行时注解和编译时注解。
注解利用的原理也不一样,有的是利用反射,比如KJFrameForAndroid, xUtils, afinal, thinkAndroid,有的是利用aapt资源打包。反射自然效率比较低,在反射部分举例分析。
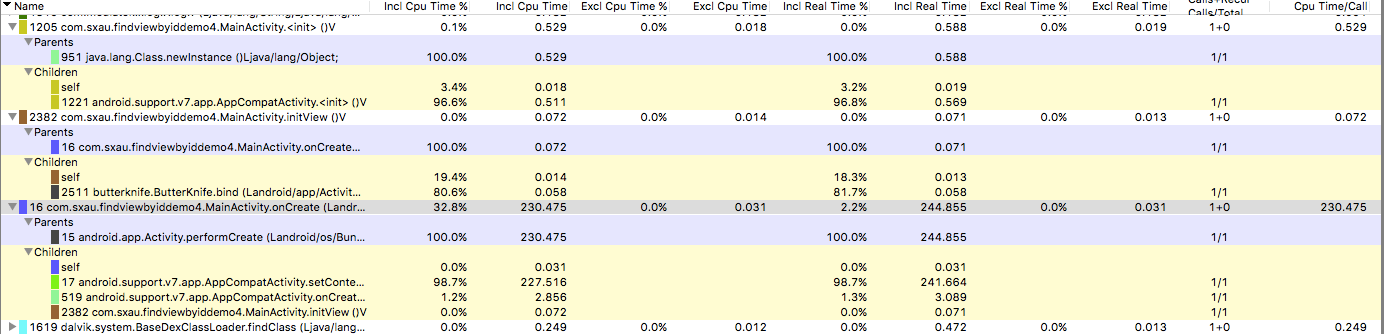
ButterKnife处理注解是在编译的时候,处理了@Bind、@OnClick等这些注解,所以效率比较高。
即:
@BindView(R.id.tv_demo1)
TextView textView;
@BindView(R.id.tv_demo2)
TextView textView2;
@BindView(R.id.tv_demo3)
TextView textView3;
@BindView(R.id.iv_test)
ImageView imageView;
@BindView(R.id.btn_test)
Button button;
@BindView(R.id.et_test)
EditText editText;
//initView();
ButterKnife.bind(this);
结果如下:
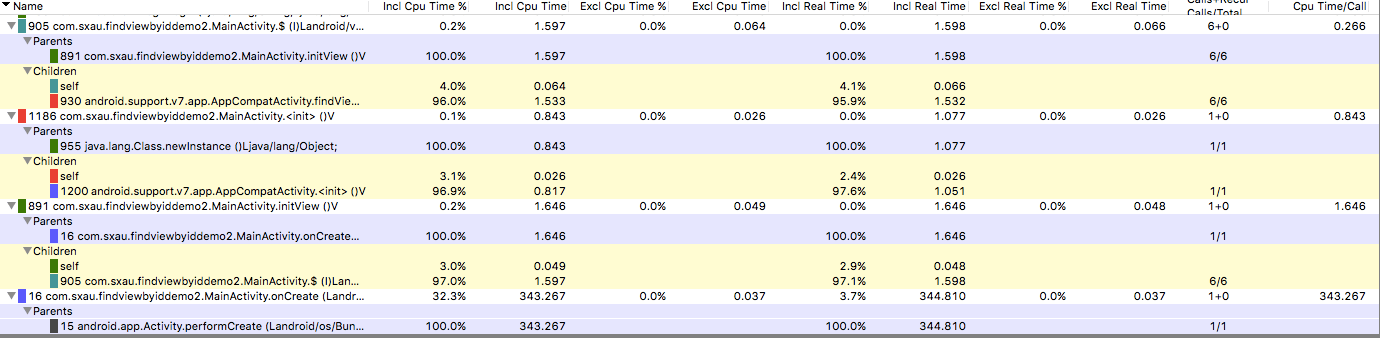
0x03 泛型
private <T extends View> T $(int resId) {
    return (T) super.findViewById(resId);
}
textView1 = $(R.id.tv_demo1);
textView2 = $(R.id.tv_demo2);
textView3 = $(R.id.tv_demo3);
button = $(R.id.btn_test);
imageView = $(R.id.iv_test);
editText = $(R.id.et_test);
测试结果:
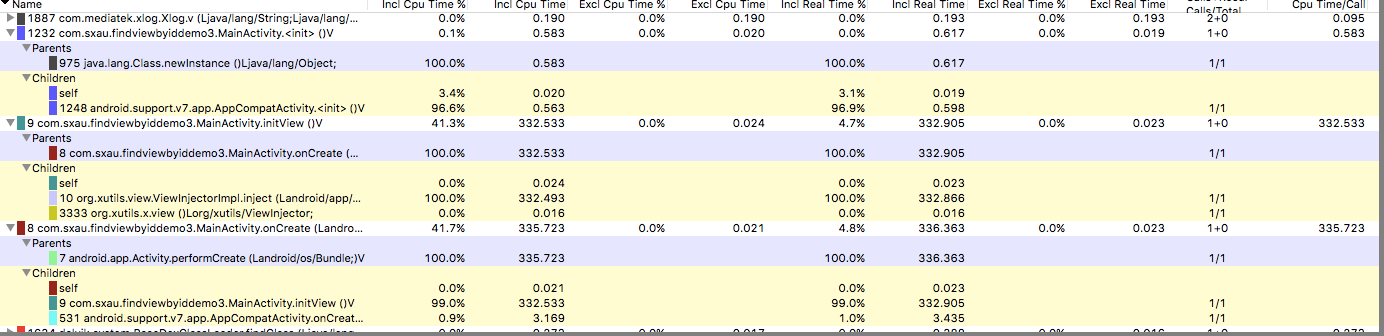
#####0x04 反射
前面也说过,有些注解框架实现视图注入是利用的反射机制,反射执行的效率是很低的。以xutils为例,测试代码:
@ContentView(R.layout.activity_main)
public class MainActivity extends AppCompatActivity {

    @ViewInject(R.id.tv_demo1)
    TextView textView1;
    @ViewInject(R.id.tv_demo2)
    TextView textView2;
    @ViewInject(R.id.tv_demo3)
    TextView textView3;
    @ViewInject(R.id.btn_test)
    Button button;
    @ViewInject(R.id.iv_test)
    ImageView imageView;
    @ViewInject(R.id.et_test)
    EditText editText;

    @Override
    protected void onCreate(Bundle savedInstanceState) {
        super.onCreate(savedInstanceState);
        x.view().inject(this);
    }
}
在DDMS的测试结果如下。
0x05 在线生成
Convert your Android XML layouts into a set of declarations and binds to save you all that manual typing. Enter a prefix for your fields, choose the scope paste in your XML and hit generate. Select "verbose" to find out why any fields are skipped.
http://android.lineten.net/layout.php
生成的结果如图所示。
0x06 DataBinding
DataBinding是谷歌官方推出的一款数据绑定框架。
使用起来比较方便,只需要在build.gradle文件里添加以下代码片段。
android {
    ....
    dataBinding {
        enabled = true
    }
}
具体的使用方法,网上也有很多,比如精通 Android Data Binding,以及官方文档。
<layout xmlns:android="http://schemas.android.com/apk/res/android">
    <data>
        <variable name="user" type="com.sxau.findviewbyiddemo5.User"/>
    </data>
    //界面代码
</layout>
然后Activity里可以使用MainActivityBinding binding = DataBindingUtil.setContentView(this, R.layout.main_activity);进行数据绑定。
前面的类即是根据xml文件名自动生成的。
其中可以实现单向数据绑定。
0x07 源码实现
想了那么多避免传统的findViewById的方法,有的性能差不多,有的性能比较低,但是官方基础实现永远是性能最快的。
public final View findViewById(int id) {
    if (id < 0) {
        return null;
    }
    return findViewTraversal(id);
}
其中调用了findViewTraversal()方法。
protected View findViewTraversal(@IdRes int id) {
    if (id == mID) {
        return this;
    }
    return null;
}
我们通常是在Activity里findViewById(),所以需要看Activity代码。
public View findViewById(@IdRes int id) {
    return getWindow().findViewById(id);
}
getWindow()的对象是继承ViewGroup的,在ViewGroup里,重写了findViewTraversal()方法:
protected View findViewTraversal(@IdRes int id) {
    if (id == mID) {
        return this;
    }

    final View[] where = mChildren;
    final int len = mChildrenCount;

    for (int i = 0; i < len; i++) {
        View v = where[i];

        if ((v.mPrivateFlags & PFLAG_IS_ROOT_NAMESPACE) == 0) {
            v = v.findViewById(id);

            if (v != null) {
                return v;
            }
        }
    }

    return null;
}
其中维护了一个View数组,然后从中遍历匹配,从而找到View对象。